Previous: Experiment 1: Reflection, refraction, and optical power
Next: Experiment 3: Interference
Subsections
Spherical mirrors are reflective optical components that are used for
imaging and beam manipulation. For a given spherical mirror of radius
 , the location of the object and the image are related by
Equations (1.2-3) and (1.2-4) in the paraxial approximation.
, the location of the object and the image are related by
Equations (1.2-3) and (1.2-4) in the paraxial approximation.
Measure the focal length of the concave spherical mirror. Use the
incandescent light source as an object. Place the concave mirror as
far from the source as possible so that the object (the filament of
the light bulb) can be assumed to be at infinity. Tilt the mirror
slightly so that you can locate the focus on a piece of paper.
Verify Equation (1.2-4) for one  value of your choice. To make
a luminous object, place the diffuser and the crossed arrow target in
front of the incandescent light source. Tilt the mirror slightly so
that you can locate the image on a piece of paper. Draw a ray diagram
explaining image formation and comment on image magnification. Look
at your own eye with the concave mirror, first at arm's length, then
at a distance of about 1.5 cm. Note the orientation of the image that
you see in each case, and draw a ray diagram explaining image
formation.
value of your choice. To make
a luminous object, place the diffuser and the crossed arrow target in
front of the incandescent light source. Tilt the mirror slightly so
that you can locate the image on a piece of paper. Draw a ray diagram
explaining image formation and comment on image magnification. Look
at your own eye with the concave mirror, first at arm's length, then
at a distance of about 1.5 cm. Note the orientation of the image that
you see in each case, and draw a ray diagram explaining image
formation.
Lenses are refractive optical components used for imaging and beam
manipulation. A simple lens consists of two refracting
surfaces. (A lens with more than two refracting surfaces is called a
compound lens.) The exact shape of the surfaces involved
depends on the type of lens. The most widely used lenses are spherical lenses. These lenses cannot accomplish perfect imaging or
beam shaping; they introduce unwanted errors called aberrations.
However, spherical lenses are very widely used due to the relative
technological ease, and hence low cost, with which spherical surfaces
can be manufactured. (Aspherical lenses or compound lenses are
used for more critical applications where aberrations cannot be
tolerated.) Simple lenses for which the thickness of the lens can be
ignored are called thin lenses. Equations (1.2-12) through
(1.2-14) in the textbook are valid for simple, thin, spherical lenses.
Lenses can be used in various configurations for imaging purposes. An
image may be erect (right side up) or inverted (up side
down) with respect to the object. It may be magnified or demagnified
by a certain amount. It can also be a real image or a virtual image. When light rays converge to a point to create an
image, the image is real and can be viewed on a screen (such as a
piece of paper). A virtual image is formed when light rays seem to
diverge from a point where there are no actual light rays.
Set up an experiment to verify the imaging equation (1.2-13) and
magnification (1.2-14) for five values of  . To make an object,
place the diffuser and the crossed arrow target in front of the
incandescent light source. Note that there is a scale on the crossed
arrow target to facilitate magnification measurements. (Each tick
mark is a millimeter.) Use the
. To make an object,
place the diffuser and the crossed arrow target in front of the
incandescent light source. Note that there is a scale on the crossed
arrow target to facilitate magnification measurements. (Each tick
mark is a millimeter.) Use the  mm lens to image the crossed
arrow target. Measure the image distance, orientation, magnification,
and type (real or virtual) for object distances of
mm lens to image the crossed
arrow target. Measure the image distance, orientation, magnification,
and type (real or virtual) for object distances of  ,
,
 ,
,  ,
,  , and
, and  . For virtual images, you
can use the parallax method to locate the position of the image: Look
through the lens to see the virtual image. Have your partner hold a
pencil right above where you think the virtual image is located. Move
your head from side to side and see whether the pencil or the image
seems to move more with respect to the background. Whichever seems to
move more is closer to you than the other one. Reposition the pencil
and repeat until you locate the virtual image. (Magnification
measurements for virtual images are more difficult.) Draw a ray
diagram explaining image formation for each value.
. For virtual images, you
can use the parallax method to locate the position of the image: Look
through the lens to see the virtual image. Have your partner hold a
pencil right above where you think the virtual image is located. Move
your head from side to side and see whether the pencil or the image
seems to move more with respect to the background. Whichever seems to
move more is closer to you than the other one. Reposition the pencil
and repeat until you locate the virtual image. (Magnification
measurements for virtual images are more difficult.) Draw a ray
diagram explaining image formation for each value.
In this experiment, your eye is part of the imaging optics; to ``see''
an object means having a real image of the object on the retina of
your eye. The lens of the human eye is a positive lens that images
objects around us onto the retina. To accommodate for different
object distances, the curvature and as a result the focal length of
the lens changes. For far away objects, the effective focal length is
about 17 mm, the distance between the lens and the retina. Calculate the focal length that the eye must have to focus onto the
retina an object 30 cm away. A nearsighted (myopic) person cannot
focus at infinity but can focus on close by objects. What do you
think is wrong with his/her lens? A diopter, by definition, is
one over the focal length in meters; a normal human eye is about 59
diopters. Calculate the focal length of the eye of a person who
is myopic with a correction of  diopters.
Use the imaging setup in the previous part. Set  .
Position an iris between the lens and the object, as close to the lens
as possible. Make sure that the iris is centered on the lens. Vary
the diameter of the iris and observe the image. In this configuration
the iris serves as an aperture stop, and works just like the
aperture of a camera, controlling the intensity or brightness of the
image. Next, position the iris as close to the object as possible and
vary the diameter. In this configuration the iris serves as a field stop.
.
Position an iris between the lens and the object, as close to the lens
as possible. Make sure that the iris is centered on the lens. Vary
the diameter of the iris and observe the image. In this configuration
the iris serves as an aperture stop, and works just like the
aperture of a camera, controlling the intensity or brightness of the
image. Next, position the iris as close to the object as possible and
vary the diameter. In this configuration the iris serves as a field stop.
Telescopes are optical systems used to view far away objects. There
are many different types of telescopes. A Keplerian telescope is shown
in the figure. Consider an object at infinity with an angular spread
of  . Show that the angular magnification
 is
is
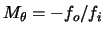 under
the paraxial approximation. Show that the transverse
magnification, that is the magnification of the transverse size of a
parallel bundle of rays, is
under
the paraxial approximation. Show that the transverse
magnification, that is the magnification of the transverse size of a
parallel bundle of rays, is
 . Construct a Keplerian
telescope using the
. Construct a Keplerian
telescope using the  mm and mm lenses, and use it to
image the crossed arrow target. Focus the image that you see by fine
tuning the distance between the two lenses.
mm and mm lenses, and use it to
image the crossed arrow target. Focus the image that you see by fine
tuning the distance between the two lenses.
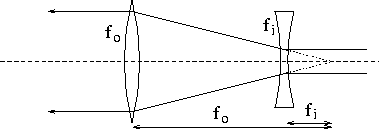
Telescopes are also used to manipulate laser beams. A Galilean
telescope used for expanding a laser beam is shown in the figure. As
in Keplerian telescopes, the distance between the two lenses should be
the sum of the focal lengths of the two lenses, with the negative lens
having a negative focal length. Similarly, the magnification of the
telescope is given by the ratio of the focal lengths. Construct a
Galilean telescope using the  mm and
  mm lenses to
expand the laser beam (diameter approximately 0.48 mm). When
constructing a telescope for beam expansion, always verify that the
resulting beam is well collimated (the beam diameter stays constant
with propagation distance), and adjust the distance between the lenses
to achieve this. What is the magnification in the beam diameter?
mm lenses to
expand the laser beam (diameter approximately 0.48 mm). When
constructing a telescope for beam expansion, always verify that the
resulting beam is well collimated (the beam diameter stays constant
with propagation distance), and adjust the distance between the lenses
to achieve this. What is the magnification in the beam diameter?
In this part of the experiment you will observe various types of lens
aberrations.
- Spherical aberration
Produce a collimated beam of light
by expanding the laser beam with the Galilean telescope of the
previous part. Position an iris and the  mm lens in the beam
path, as close to each other as possible, with the iris facing the
light source. Close the iris down. Find the paraxial focus where a
very small light spot is obtained; place a screen at the paraxial
focus. Slowly open the iris and observe how the light rays begin to
miss the paraxial focus, forming a much broader circle. Translate the
screen to find the smallest possible light spot, known as the circle of least confusion. Note the relative positions of the circle
of least confusion and the paraxial focus.
mm lens in the beam
path, as close to each other as possible, with the iris facing the
light source. Close the iris down. Find the paraxial focus where a
very small light spot is obtained; place a screen at the paraxial
focus. Slowly open the iris and observe how the light rays begin to
miss the paraxial focus, forming a much broader circle. Translate the
screen to find the smallest possible light spot, known as the circle of least confusion. Note the relative positions of the circle
of least confusion and the paraxial focus.
- Coma
With the same setup, close the iris down and tilt
the mm lens on the bench by about  -
- ;
you may have to recenter the lens on the beam path. Place a screen at
the paraxial focus. Slowly open the iris and observe how the light
rays begin to form a shape similar to a comet tail (hence the name
coma).
;
you may have to recenter the lens on the beam path. Place a screen at
the paraxial focus. Slowly open the iris and observe how the light
rays begin to form a shape similar to a comet tail (hence the name
coma).
- Astigmatism
Astigmatism appears when extended off-axis
objects are imaged with spherical lenses. To make an object, place
the diffuser and the crossed arrow target in front of the incandescent
light source. Position the mm lens 30-40 cm from the object,
tilted at angle of about  . Note the relative positions of
the screen where the vertical and horizontal features of the object
come into focus.
. Note the relative positions of
the screen where the vertical and horizontal features of the object
come into focus.
- Field curvature
When flat objects are imaged with
spherical lenses, all transverse points on the image are in focus at
the same time on a curved surface, instead of a flat plane. (This is
why in cinemas with good projection systems, the screen is curved
rather than flat.) Position the mm lens so that image
magnification is greater than unity. (Do not tilt the lens.)
Concentrate on the millimeter tick marks on the image. The one in the
center is not in perfect focus when the ones on the sides are, and
vice versa. Describe the curvature of the image field.
- Distortion
Distortion results when image magnification
is a function of radial distance. Look at various images of parallel
lines on a piece of paper with the mm lens. Hold the lens at
various distances from the paper, creating both virtual and real
images. The two types of distortion that you see are called barrel
and pin-cushion due to their shapes. Note your observations.
- Chromatic aberration
Chromatic aberrations are due to
dispersion (wavelength dependent refractive index) in the glass of the
lens, resulting in different wavelengths coming to a focus at slightly
different distances. Position the diffuser and the 0.75 mm light
source aperture in front of the incandescent light source. Image the
aperture with the  mm lens so that image magnification is
approximately unity. Move the screen back and forth around the focus
and observe the colors which appear on the periphery of the image.
How does the focal length vary as a function of wavelength?
mm lens so that image magnification is
approximately unity. Move the screen back and forth around the focus
and observe the colors which appear on the periphery of the image.
How does the focal length vary as a function of wavelength?
Previous: Experiment 1: Reflection, refraction, and optical power
Next: Experiment 3: Interference
Orhan Aytür