Previous: Experiment 3: Interference
Next: Experiment 5: Gaussian beams
Subsections
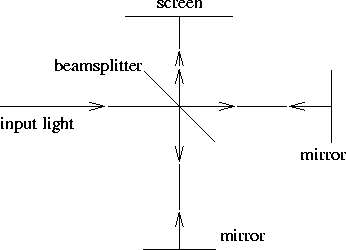
A schematic of the Michelson interferometer is shown in the figure.
The input light is split at the beamsplitter and directed to two
mirrors. These mirrors reflect the light back to the beamsplitter
where the two waves combine. The phase difference between these waves
depends on the optical path length difference between the two arms of
the interferometer. The resulting interference can be observed on a
screen placed at the output. When the optical path length of the two
arms are exactly equal or differ by an integral multiple of the
wavelength  , the interfering waves have the same phase and
the output is bright. When the path lengths differ from an integral
multiple of by
, the interfering waves have the same phase and
the output is bright. When the path lengths differ from an integral
multiple of by  , the output is dark.
The phase curvatures (wavefronts) of the two interfering waves may
depend on the optical path length of the interferometer arms.
For example when the input field is a diverging Gaussian beam,
different path lengths result in different phase curvatures for the
interfering waves. Hence, the interference pattern assumes a circular
pattern. In other words, the phase difference becomes a function of
the radial distance on the transverse plane.
The optics used in the interferometer have delicate dielectric
coatings on them. Extreme care must be taken not to scratch the
optical surfaces.
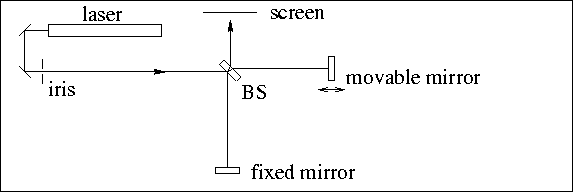
To set up a Michelson interferometer, first obtain a laser beam that
is parallel to the optical bench.
Mount the dielectric beamsplitter in a fixed optic mount and position
it at 45 to the beam. Make sure that the beam splitting
surface (coated surface) is facing the laser. Try to position the beam
as close to the center of the beamsplitter as possible. The reflected
beam may not be perfectly parallel to the bench in the vertical
direction, but this does not cause any problems. Position an iris on
the laser beam for alignment purposes, as shown in the figure. Next,
mount a dielectric mirror in a fixed height adjustable mirror mount,
and position it near 0 incidence angle and as far from the
beamsplitter as possible, as shown in the figure. You will be able
to see the reflection on the iris. Adjust the mirror so that the
reflected beam hits the iris close to the aperture. This will insure
that the reflected beam does not get back to the laser and cause
problems.
to the beam. Make sure that the beam splitting
surface (coated surface) is facing the laser. Try to position the beam
as close to the center of the beamsplitter as possible. The reflected
beam may not be perfectly parallel to the bench in the vertical
direction, but this does not cause any problems. Position an iris on
the laser beam for alignment purposes, as shown in the figure. Next,
mount a dielectric mirror in a fixed height adjustable mirror mount,
and position it near 0 incidence angle and as far from the
beamsplitter as possible, as shown in the figure. You will be able
to see the reflection on the iris. Adjust the mirror so that the
reflected beam hits the iris close to the aperture. This will insure
that the reflected beam does not get back to the laser and cause
problems.
For the movable mirror, screw a post holder onto the translation stage
and place a post in the post holder. Mount another dielectric mirror
on an adjustable mirror mount. Mount this on the XZ translation stage
using the right angle post clamp such that the beam height is
approximately 3 inches. Position the translation stage on the bench such
that the two arms of the interferometer have nearly the same length.
Place a piece of white paper as a screen and locate the beams coming
from the two arms of the interferometer. There may be other stray
reflections on the screen as well. Adjust the tilt angle of the
movable mirror such that the two spots are on top of each other. Can
you observe any interference? Translate the mirror back and forth with
the micrometer to vary the path length difference.
Mount a negative lens ( mm) on a threaded optic mount. Position
this lens near the beamsplitter at the input of the
interferometer. Adjust the lateral position of the lens so that the
beam goes through its center. Also, watch for the weak surface
reflections from the lens on the iris to make the lens perpendicular
to the beam. Realign the movable mirror to obtain a symmetric circular
fringe pattern on the screen. Move the mirror with the micrometer and
watch the fringes move.
mm) on a threaded optic mount. Position
this lens near the beamsplitter at the input of the
interferometer. Adjust the lateral position of the lens so that the
beam goes through its center. Also, watch for the weak surface
reflections from the lens on the iris to make the lens perpendicular
to the beam. Realign the movable mirror to obtain a symmetric circular
fringe pattern on the screen. Move the mirror with the micrometer and
watch the fringes move.
Calculate the mirror displacement from a count of the fringes as you
turn the micrometer. Avoid leaing on the table to prevent random
fluctuations. Compare the measured displacement with a direct reading
off the micrometer.
The interferometer can be used to measure any physical process that
changes the phase of light. One such application is the measurement of
the index of refraction of air. This is accomplished by using a vacuum
cell in one arm to change the optical path length. For reasonably low
pressures, the index of refraction of a gas varies linearly with
pressure. Mount the vacuum cell on the plate holder. Using a post
holder, place the vacuum cell in front of the movable mirror and
connect the vacuum pump. Rotate the cell so that the windows are
perpendicular to the beam. (Disregard the distortions in the fringe
pattern.) The air in the cell is at atmospheric pressure (1 bar or 76
cm Hg) at this point. Count the movement of the fringes as you slowly
pump out the air in the vacuum cell. Record the final pressure
(atmospheric pressure minus the gauge reading). Make a plot of the
refractive index as a function of pressure assuming linear
dependence. (The vacuum cell is 3 cm long.) What is the refractive
index at atmospheric pressure?
It is possible to observe interference fringes even with white
light. Even though white light from an incandescent light source is
temporally incoherent, fringes will form if the interferometer
path lengths are exactly equal. (Actually, equal within the very
short coherence time.)
The laboratory assistant will demonstrate white light fringes with a
separate Michelson interferometer. The interferometer will first be
aligned with a laser. Then, you will turn the micrometer to make the
path lengths exactly equal. When this is achieved, the phase
curvatures will ideally be identical, and there will be only one
fringe. At this point, the assistant will replace the laser with the
incandescent light source and form the white light fringes. Move
the micrometer to see how sensitive these fringes are to the absolute
path difference. Find the coherence time of the incandescent light
source from this measurement.
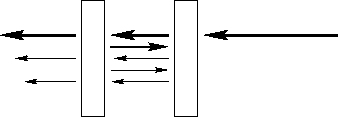
A Fabry-Perot interferometer consists of two partially transmitting
mirrors facing each other. The light wave bounces back and forth
between the mirrors. At each pass, a portion of the light is
transmitted out of the interferometer. Waves from these infinite
number of passes interfere at the output. This is an example of
multi-wave interference. The laboratory assistant will demonstrate a
Fabry-Perot interferometer.
Previous: Experiment 3: Interference
Next: Experiment 5: Gaussian beams
Orhan Aytür